VuePress で静的ページを作成し、GitHub Pages に公開する
- VuePress 環境構築
- GitHub Pages の公開
- CircleCI でビルド/デプロイ
までを行う
開発環境
- OS: macOS Sierra
- Node.js: v10.13.0
- npm: 6.4.1
- yarn: 1.12.1
VuePress 環境構築
VuePress 公式ドキュメントよると、
の2通りの方法が用意されている。
今回は $ yarn init でプロジェクトを作成し VuePress を導入する。
Git リポジトリを作成
GitHub でリポジトリを作成して $ git clone
ローカルで作成する場合は
$ mkdir vue-press
$ cd vue-press
$ git init
npm プロジェクトを新規作成
$ yarn init
yarn init v1.12.1
question name (vuepress):
question version (1.0.0):
question description:
question entry point (index.js):
question repository url:
question author (y4shiro <y4shironao@gmail.com>):
question license (MIT):
question private:
success Saved package.json
✨  Done in 8.99s.
VuePress を yarn でインストール
VuePress を下記コマンドでインストールします。
$ yarn add - D vuepress
src/ ディレクトリを作成し、README.md を置く。
公式ドキュメントでは docs/ を推奨しているが、
後に作成する GitHub Pages の公開ディレクトリと競合するため、
docs/ 以外の名前でディレクトリ作成する。
$ mkdir src
$ echo '# Hello VuePress' > src/README.md
package.json に vuepress 用のコマンドを追記する。
{
  "scripts": {
    "src:dev": "vuepress dev src",
    "src:build": "vuepress build src"
  }
}
VuePress の開発環境を起動する
下記コマンドを実行すると開発環境が立ち上がるので、
表示された localhost のアドレスにアクセスして確認する。
$ yarn docs:dev
開発環境を立ち上げたまま、README.md を書き換えると反映されます。
VuePress のビルド
下記コマンドを実行すると、src/.vuepress/dist に静的ファイルが生成される。
$ yarn src:build
.vuepress/config.js の追加
静的ファイルの生成先、ページタイトルなどの変更を行いたいので、
config ファイルを追加する。
# .vuepress/ ディレクトリがない場合は作成
$ mkdir src/.vuepress/

# src/.vuepress/config.js を追加
$ touch src/.vuepress/config.js
.vuepress/config.jp に設定追加
下記設定の場合、
- title: 公開ページのタイトル
- description: ページ説明
- dest: build 時の出力先指定
- base: GitHub Pages の公開ディレクトリパス
module.exports = {
  title: 'GitHub Pages product by VuePress',
  description: 'VuePress やっていき',
  dest: 'docs/',
  base: '/vue-press/',
}
GitHub Pages の公開
docs/ 公開
GitHub Pages を公開するには、GitHub リポジトリの Settings > GitHub Pages にて設定します。
Source の項目にて、公開するソースを選択します。
- master branch: master ブランチのルート以下を全て公開
- master branch /docs folder: master ブランチの
/docs以下を公開 - None: GitHub Pages の公開を無効化
今回は docs 以下を公開するので、2を選択する。
$ yarn src:build でビルドした結果を master branch に commit, push すると GitHub Pages にページが公開される。
- https://y4shiro.github.io/vue-press/
CircleCI でビルド、デプロイ
手動で build, commit, push をするのは手間がかかるので、
CircleCI を導入して自動化します。
CircleCI サインアップ
CircleCI のアカウントを取得します。
CircleCI
GitHub アカウントでサインアップを行えるので、
トップページの右上にある Sign UP から次へ進みます。
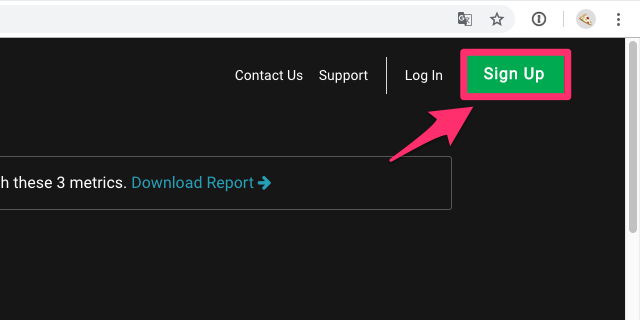
Sign Up Now のページにて、Sign Up with GitHub をクリックして GitHub アカウントでサインアップを行います。

CircleCI と GitHub リポジトリの連携
CircleCI のサイドメニューより ADD PROJECT のページへ進み、
任意のリポジトリを選択してください。

CircleCI 設定ファイルの作成
CircleCI 実行時に読み込む config ファイルを作成/追加します。
パスは /.circleci/config.yml です。
キャッシュ周りは下記参考
- https://circleci.com/docs/2.0/yarn/#section=deployment
- https://circleci.com/docs/2.0/caching/#npm-node--
version: 2

jobs:
  build:
    working_directory: ~/tmp
    docker:
      - image: node:9.11
        environment:
          TZ: "/usr/share/zoneinfo/Asia/Tokyo"
          DEPLOY_BRANCH: master

    steps:
      - checkout

      - restore_cache:
          keys:
            - yarn-packages-{{ .Branch }}-{{ checksum "yarn.lock" }}
            - yarn-packages-{{ .Branch }}
            - yarn-packages-

      - run:
          command: yarn install

      - save_cache:
          paths:
            - node_moduels
          key: yarn-packages-{{ .Branch }}-{{ checksum "yarn.lock" }}

      - run:
          command: |
            if [ "${CIRCLE_BRANCH}" = "${DEPLOY_BRANCH}" ]; then
              chmod +x deploy.sh
              ./deploy.sh
            fi
CircleCI からのデプロイ用 Shell 作成
CircleCI で build 後、GitHub へ自動デプロイを行うための Shell を作成します。
#!/bin/bash -e

# build
yarn run --silent build

# ビルド生成物の差分がない場合、デプロイせずに終了する
if [ "$(git status --porcelain | wc -l | xargs)" -eq 0 ]; then
  echo "Not exist deploying contents."
  exit 0
fi

git config --global user.name "Circle CI"
git config --global user.email "<>"
git add -A
git commit -m "[ci skip] Deploy by CI"

git push -f $(git config --get remote.origin.url) master:master > /dev/null 2>&1

echo "Deploy completed."
GitHub リポジトリに push して動くことを確認
上記作業が完了したら、GitHub リポジトリの Master ブランチに push して、
CircleCI でビルド/デプロイが行われることを確認してください。
